Build a Telegram Bot That Talks to the Blockchain
Imagine: you open Telegram in the morning, and your bot sends you a message "Your rewards on Ethereum just increased by 50.3 USDC 🎉."
No more switching networks. No dashboards. No wallet reconnections. Just a message, straight from the blockchain.
That’s the idea behind this project. In this article, I’ll show you how to build your own Telegram bot that talks directly to the blockchain through the Allbridge Core REST API.
It’s not just another "hello world" tutorial. You’ll actually create something useful, a bot that connects to the Ethereum network, saves wallet addresses, and can later monitor real liquidity rewards.
You don’t need to be a professional developer. If you can follow a recipe, you can follow this. By the end, you’ll have a real working bot, hosted locally, powered by PHP, Docker, and a few free tools.
-ed646576-ad63-4dc7-858b-819643b8c8d1.png)
The Challenge
If you’ve ever provided liquidity on DeFi platforms, you know the pain. One pool on Ethereum, another on Polygon, something else on BNB Chain - and for each, you need to reconnect your wallet again and again for every chain.
Switch chains, or switching wallets, wait for RPCs to sync, open every one in a different tab if you want to see them all together, resize windows to have them all on the one screen, and multiply numbers in your head. It’s like doing taxes, but every day.
Wouldn’t it be simpler if a small bot just told you what’s going on? "Hey, your total rewards went up." or "You’ve reached your USDC threshold, time to claim."
That’s the experience we’re going to create, step by step. And it all starts with one simple tool: the Allbridge Core REST API.
What You’ll Need Before Starting
This article focuses on setup, but there are a few tools you’ll need beforehand. If you’re new to programming, don’t worry, each of these comes with simple installation guides:
Before writing a single line of code, let’s make sure we have the basic ingredients ready. These tools are completely free and work on any OS.
- Git – to download repositories
https://git-scm.com/downloads - Docker – to run the API in an isolated environment
https://docs.docker.com/get-docker - PHP (8.1 or higher) – the language of our bot
https://www.php.net/downloads - Composer – PHP’s package manager
https://getcomposer.org/download
After installation, check that everything works by running in your terminal:
git --version
docker --versionphp -v
Step 1: Run the Allbridge Core REST API
The Allbridge Core REST API is your window into the blockchain world. It allows you to fetch balances, build transactions, and interact with liquidity pools, without writing Solidity or deploying smart contracts yourself.
Let’s set it up locally.
1. Clone the repository:
git clone https://github.com/allbridge-io/allbridge-core-rest-api.git
cd allbridge-core-rest-api
This downloads the official open-source REST API used by DApps and integrations.
2. Create a .env file
Since we’ll start with Ethereum only, it’s just one line:
NETWORKS=["ETH"]
ETH_NODE_URL=https://ethereum-rpc.publicnode.com
This tells the API which blockchain node to connect to.
3. Run it with Docker:
docker run -p 3000:3000 --env-file .env -d allbridge/io.allbridge.rest-api:latestDocker will pull the ready-made image and start a container running the API on port 3000.
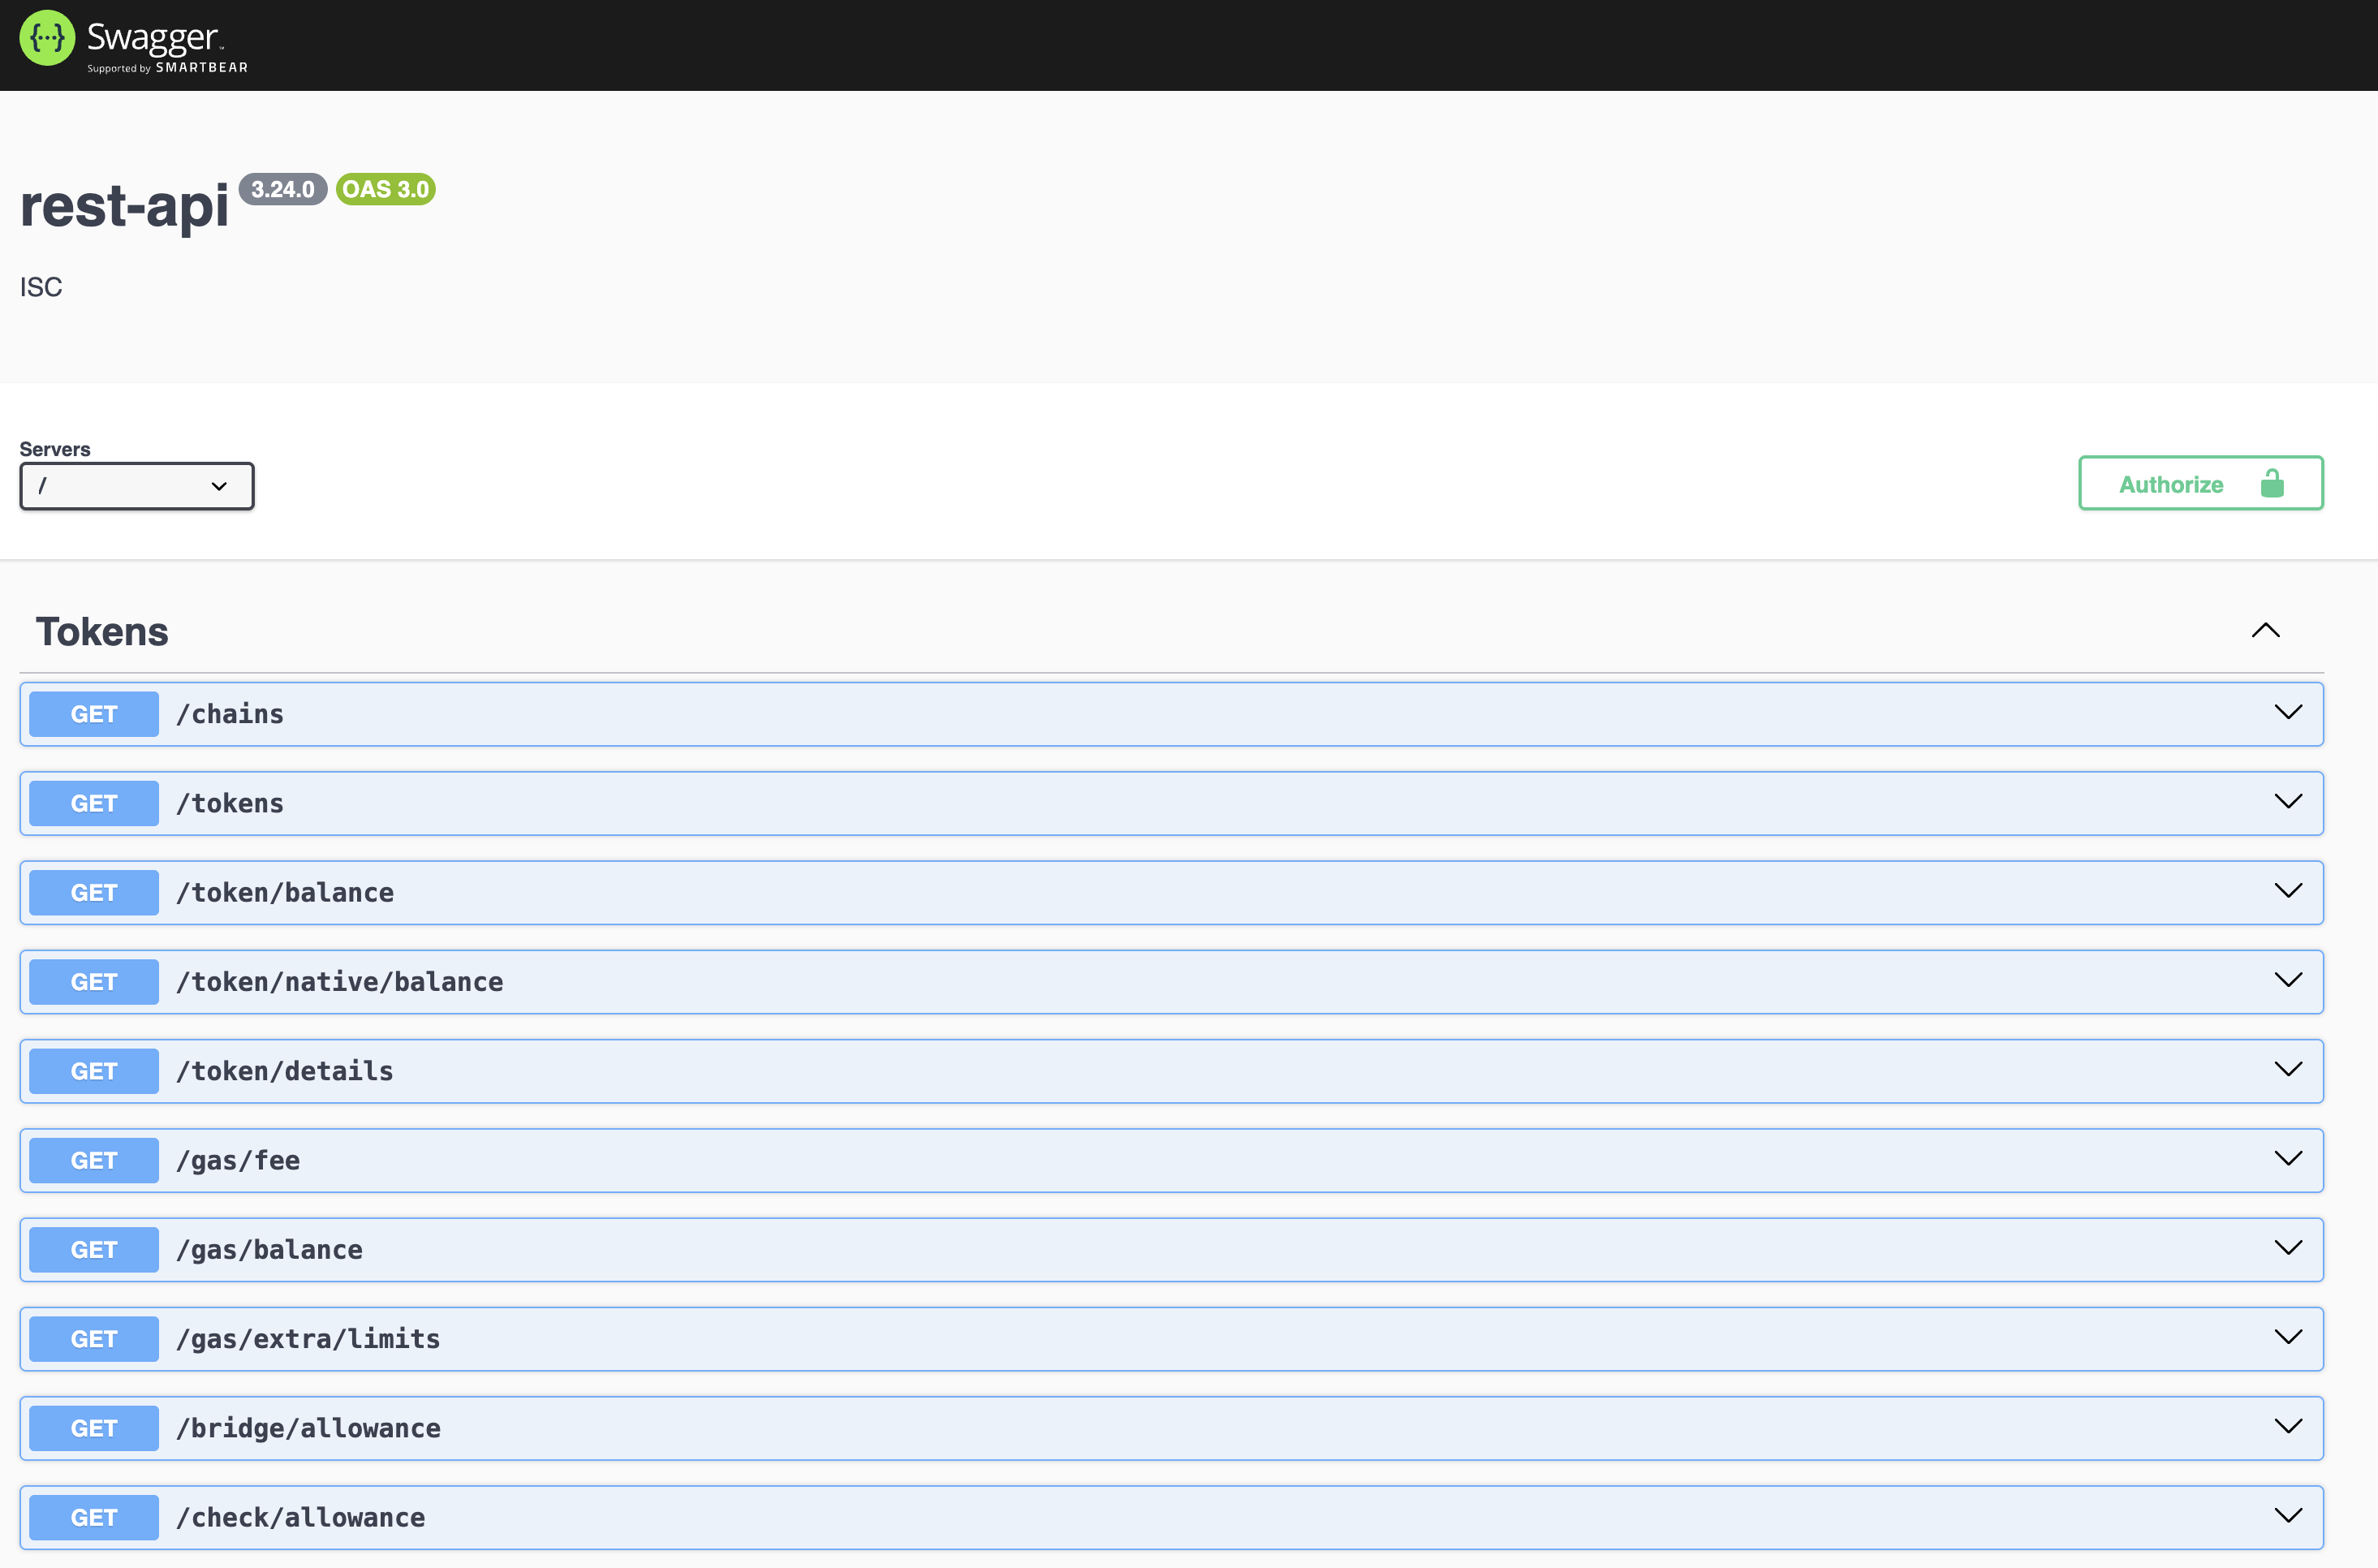
4. Open your browser and go to:

You’ll see a Swagger interface — that’s a live playground where you can test every endpoint.
Congrats! 🎉
Your local blockchain API is running. You now have your own Allbridge Core server.
Step 2: Setting Up the Bot Project
Telegram bots need a small backend to handle messages and store user data. That’s why we’ll use MySQL (inside Docker) and a PHP library that takes care of all Telegram logic.
1. Create your Telegram bot using @BotFather
- Open link @BotFather
- Send /newbot
- Choose a name and username (for example, AllbridgeRewardsBot)
- Copy the HTTP API token that BotFather gives you; we’ll need it later.
- That token is your bot’s passport to the Telegram API. Keep it safe.
2. Run a MySQL database in Docker.
The Telegram library stores conversations, users, and messages in MySQL. You can start one locally with this command:
docker run --name mysql-bot -e MYSQL_ROOT_PASSWORD=secret -e MYSQL_DATABASE=telegram_bot -p 3306:3306 -d mysql:latestThis creates a container called mysql-bot with a database named telegram_bot. You can connect to it later from PHP using localhost:3306, user root, password secret
3. Initialize your PHP bot project:
For that we would clone example repository
git clone https://github.com/php-telegram-bot/example-bot.git my-allbridge-bot
cd ./my-allbridge-bot
php composer update
4. Add your first custom command:
Create a new file SubscribeCommand.php in folder CustomCommands with next content:
<?php

namespace Longman\TelegramBot\Commands\UserCommands;

use Longman\TelegramBot\Commands\UserCommand;
use Longman\TelegramBot\Entities\Keyboard;
use Longman\TelegramBot\Entities\ServerResponse;
use Longman\TelegramBot\Exception\TelegramException;
use Longman\TelegramBot\Request;
use Longman\TelegramBot\Conversation;

class SubscribeCommand extends UserCommand
{
    protected $name = 'subscribe';
    protected $description = 'Subscribe for monitoring liquidity rewards';
    protected $usage = '/subscribe';
    protected $version = '1.2.0';
    protected $private_only = true;

    protected $chainsMap = [];

    private $poolsData = [];

    public function execute(): ServerResponse
    {
        $message = $this->getMessage();
        $chat_id = $message->getChat()->getId();
        $user_id = $message->getFrom()->getId();
        $text = trim($message->getText(true));
        try {
            // Fetch pools data if not already loaded
            if (empty($this->poolsData)) {
                $this->poolsData = $this->fetchPoolsData();
            }
            if (empty($this->chainsMap)) {
                foreach ($this->poolsData as $pool_name => $pool_data) {
                    $this->chainsMap[$pool_data["name"]] = $pool_data["chainSymbol"];
                }
            }

            // Start or continue the conversation
            $conversation = new Conversation($user_id, $chat_id, $this->getName());
            $notes = &$conversation->notes;
            !is_array($notes) && $notes = [];
            $state = $notes['state'] ?? 0;

            switch ($state) {
                case 0: // Step 1: Ask for blockchain
                    if ($text === '') {
                        $keyboard = new Keyboard(...array_chunk(array_keys($this->chainsMap), 4));
                        $keyboard->setResizeKeyboard(true)->setOneTimeKeyboard(true);

                        $notes['state'] = 0;
                        $conversation->update();

                        return Request::sendMessage([
                            'chat_id' => $chat_id,
                            'text' => 'Select the blockchain for your wallet:',
                            'reply_markup' => $keyboard,
                        ]);
                    }

                    if (!isset($this->poolsData[$this->chainsMap[$text]])) {
                        return Request::sendMessage([
                            'chat_id' => $chat_id,
                            'text' => 'Invalid blockchain selected. Please choose from the list.',
                        ]);
                    }

                    $notes['blockchain'] = $this->chainsMap[$text];
                    $notes['state'] = 1;
                    $conversation->update();

                    $tokens = array_column($this->poolsData[$notes['blockchain']]['tokens'], 'symbol');

                    $keyboard = new Keyboard(...array_chunk($tokens, 4));
                    $keyboard->setResizeKeyboard(true)->setOneTimeKeyboard(true);

                    return Request::sendMessage([
                        'chat_id' => $chat_id,
                        'text' => 'Select the token you want to monitor:',
                        'reply_markup' => $keyboard,
                    ]);

                case 1: // Step 2: Ask for token
                    if ($text === '') {
                        return Request::sendMessage([
                            'chat_id' => $chat_id,
                            'text' => 'Please select the token:',
                        ]);
                    }

                    $blockchain = $notes['blockchain'];
                    $tokens = array_column($this->poolsData[$blockchain]['tokens'], 'symbol');

                    if (!in_array($text, $tokens)) {
                        return Request::sendMessage([
                            'chat_id' => $chat_id,
                            'text' => 'Invalid token for the selected blockchain. Please try again.',
                        ]);
                    }

                    $notes['token'] = $text;
                    $notes['state'] = 2;
                    $conversation->update();

                    return Request::sendMessage([
                        'chat_id' => $chat_id,
                        'text' => 'Enter your wallet address (for liquidity providers on core.allbridge.io):',
                    ]);

                case 2: // Step 3: Ask for wallet address
                    if ($text === '') {
                        return Request::sendMessage([
                            'chat_id' => $chat_id,
                            'text' => 'Please enter your wallet address:',
                        ]);
                    }

                    $notes['wallet_address'] = $text;
                    $notes['state'] = 3;
                    $conversation->update();

                    $keyboard = new Keyboard(
                        ['Hourly', 'Daily'],
                        ['Weekly', 'Only on reward threshold']
                    );
                    $keyboard->setResizeKeyboard(true)->setOneTimeKeyboard(true);

                    return Request::sendMessage([
                        'chat_id' => $chat_id,
                        'text' => 'Choose the report frequency:',
                        'reply_markup' => $keyboard,
                    ]);

                case 3: // Step 4: Ask for report frequency
                    if ($text === '') {
                        return Request::sendMessage([
                            'chat_id' => $chat_id,
                            'text' => 'Please select the report frequency:',
                        ]);
                    }

                    $notes['report_frequency'] = $text;
                    $notes['state'] = 4;
                    $conversation->update();

                    $keyboard = new Keyboard(['1', '5', '10'], ['20', '50', '100']);
                    $keyboard->setResizeKeyboard(true)->setOneTimeKeyboard(true);

                    return Request::sendMessage([
                        'chat_id' => $chat_id,
                        'text' => 'Select the reward amount threshold for notifications:',
                        'reply_markup' => $keyboard,
                    ]);

                case 4: // Step 5: Ask for reward threshold
                    if ($text === '') {
                        return Request::sendMessage([
                            'chat_id' => $chat_id,
                            'text' => 'Please select the reward threshold:',
                        ]);
                    }

                    $notes['threshold'] = $text;
                    $notes['state'] = 5;
                    $conversation->update();

                    return $this->finalizeConversation($chat_id, $notes);

                case 5: // Finalize
                    return $this->finalizeConversation($chat_id, $notes);

                default:
                    $conversation->stop();
                    return Request::sendMessage([
                        'chat_id' => $chat_id,
                        'text' => 'Something went wrong. Please try again.',
                    ]);
            }
        } catch (TelegramException | \Exception $e) {
            error_log('Error in AddSubscriptionCommand: ' . $e->getMessage());
            return Request::sendMessage([
                'chat_id' => $chat_id,
                'text' => 'An error occurred. Please try again later.',
            ]);
        }
    }

    private function fetchPoolsData(): array
    {
        $url = "{trim($this->getConfig('allbridge_core_api_url'))}/chains";
        $response = file_get_contents($url);
        $data = json_decode($response, true);

        return $data;
    }

    private function finalizeConversation(int $chat_id, array $notes): ServerResponse
    {
        $user_id = $this->getMessage()->getFrom()->getId();
        $name = "{$notes['blockchain']}-{$notes['token']}-{$notes['wallet_address']}";

        $this->saveWalletConfiguration($user_id, $notes, $name);

        $conversation = new Conversation($user_id, $chat_id, $this->getName());
        $conversation->stop();

        return Request::sendMessage([
            'chat_id' => $chat_id,
            'text' => "Your wallet has been successfully added for monitoring!\n\n"
                . "Name: $name\n"
                . "Blockchain: {$notes['blockchain']}\n"
                . "Token: {$notes['token']}\n"
                . "Wallet: {$notes['wallet_address']}\n"
                . "Frequency: {$notes['report_frequency']}\n"
                . "Threshold: {$notes['threshold']}",
            'reply_markup' => Keyboard::remove()
        ]);
    }

    private function saveWalletConfiguration(int $user_id, array $notes, string $name): void
    {
        $data = [
            'user_id'         => $user_id,
            'blockchain'      => $notes['blockchain'],
            'token'           => $notes['token'],
            'wallet_address'  => $notes['wallet_address'],
            'report_frequency'=> $notes['report_frequency'],
            'threshold'       => $notes['threshold'],
            'name'            => $name,
            'created_at'      => date('Y-m-d H:i:s'),
            'updated_at'      => date('Y-m-d H:i:s'),
        ];
        try {
            $columns = implode('`, `', array_keys($data));
            $placeholders = ':' . implode(', :', array_keys($data));
            $sql = "INSERT INTO `wallets` (`$columns`) VALUES ($placeholders)";

            $pdo = \Longman\TelegramBot\DB::getPdo();
            $sth = $pdo->prepare($sql);

            foreach ($data as $key => $value) {
                $sth->bindValue(":$key", $value);
            }

            $sth->execute();
        } catch (\PDOException $e) {
            error_log('Failed to save wallet configuration: ' . $e->getMessage());
        }
    }
}
5. Run local backend server for your telegram bot
in the project root run
php -S localhost:8080 -t ./6. Make endpoint available for telegram
Telegram needs to reach your local bot over HTTPS. Ngrok makes that easy, it creates a secure tunnel to your local server.
ngrok http 80807. And now it's time to make it works:
- Rename config.example.php to config.php and then replace all necessary values with those of your project.
- api_key => place here HTTP API token from @BotFather
- bot_username => place here the username that you have provided to @BotFather
- allbridge_core_api_url => http://localhost:3000
- webhook -> url => Copy the generated HTTPS URL (e.g. https://abcd1234.ngrok.io) to tell Telegram where to send updates
- remove // from line __DIR__ . '/CustomCommands', where we already placed our first custom command
- remove // from the lines related to MySQL, set host, user, and password
- Double-check all the lines and passed values, and save the config file
8. Let telegram know where to find your backend
open web-browser http://localhost:8080/set.php
Congrats! 🎉
Your local backend for a telegram bot is ready and live.
Step 3: Prepare Database
1. Copy bot-project database structure inside the container
docker cp vendor/longman/telegram-bot/structure.sql mysql-bot:/tmp/structure.sql2. Enter into mysql container
docker exec -it mysql-bot bash3. Create structure for bot-project
mysql -uroot -psecret telegram_bot < /tmp/structure.sql
4. Create wallets table
mysql -uroot -psecret -e "CREATE TABLE IF NOT EXISTS telegram_bot.wallets (
  id BIGINT UNSIGNED AUTO_INCREMENT PRIMARY KEY,
  user_id BIGINT NOT NULL,
  blockchain VARCHAR(16) NOT NULL,
  token VARCHAR(32) NOT NULL,
  wallet_address VARCHAR(128) NOT NULL,
  report_frequency VARCHAR(32) NOT NULL,
  threshold DECIMAL(36,18) NOT NULL,
  name VARCHAR(255) NOT NULL,
  created_at DATETIME NOT NULL,
  updated_at DATETIME NOT NULL,
  KEY idx_user (user_id),
  KEY idx_name (name)
) ENGINE=InnoDB DEFAULT CHARSET=utf8mb4;"
5. Exit from the container
exitStep 4: Test Your Bot in Action
Now that everything is connected - the REST API, your local server, the MySQL database, and Telegram - it’s time to see the bot in action.
- Open your bot in Telegram (the one you created via @BotFather).
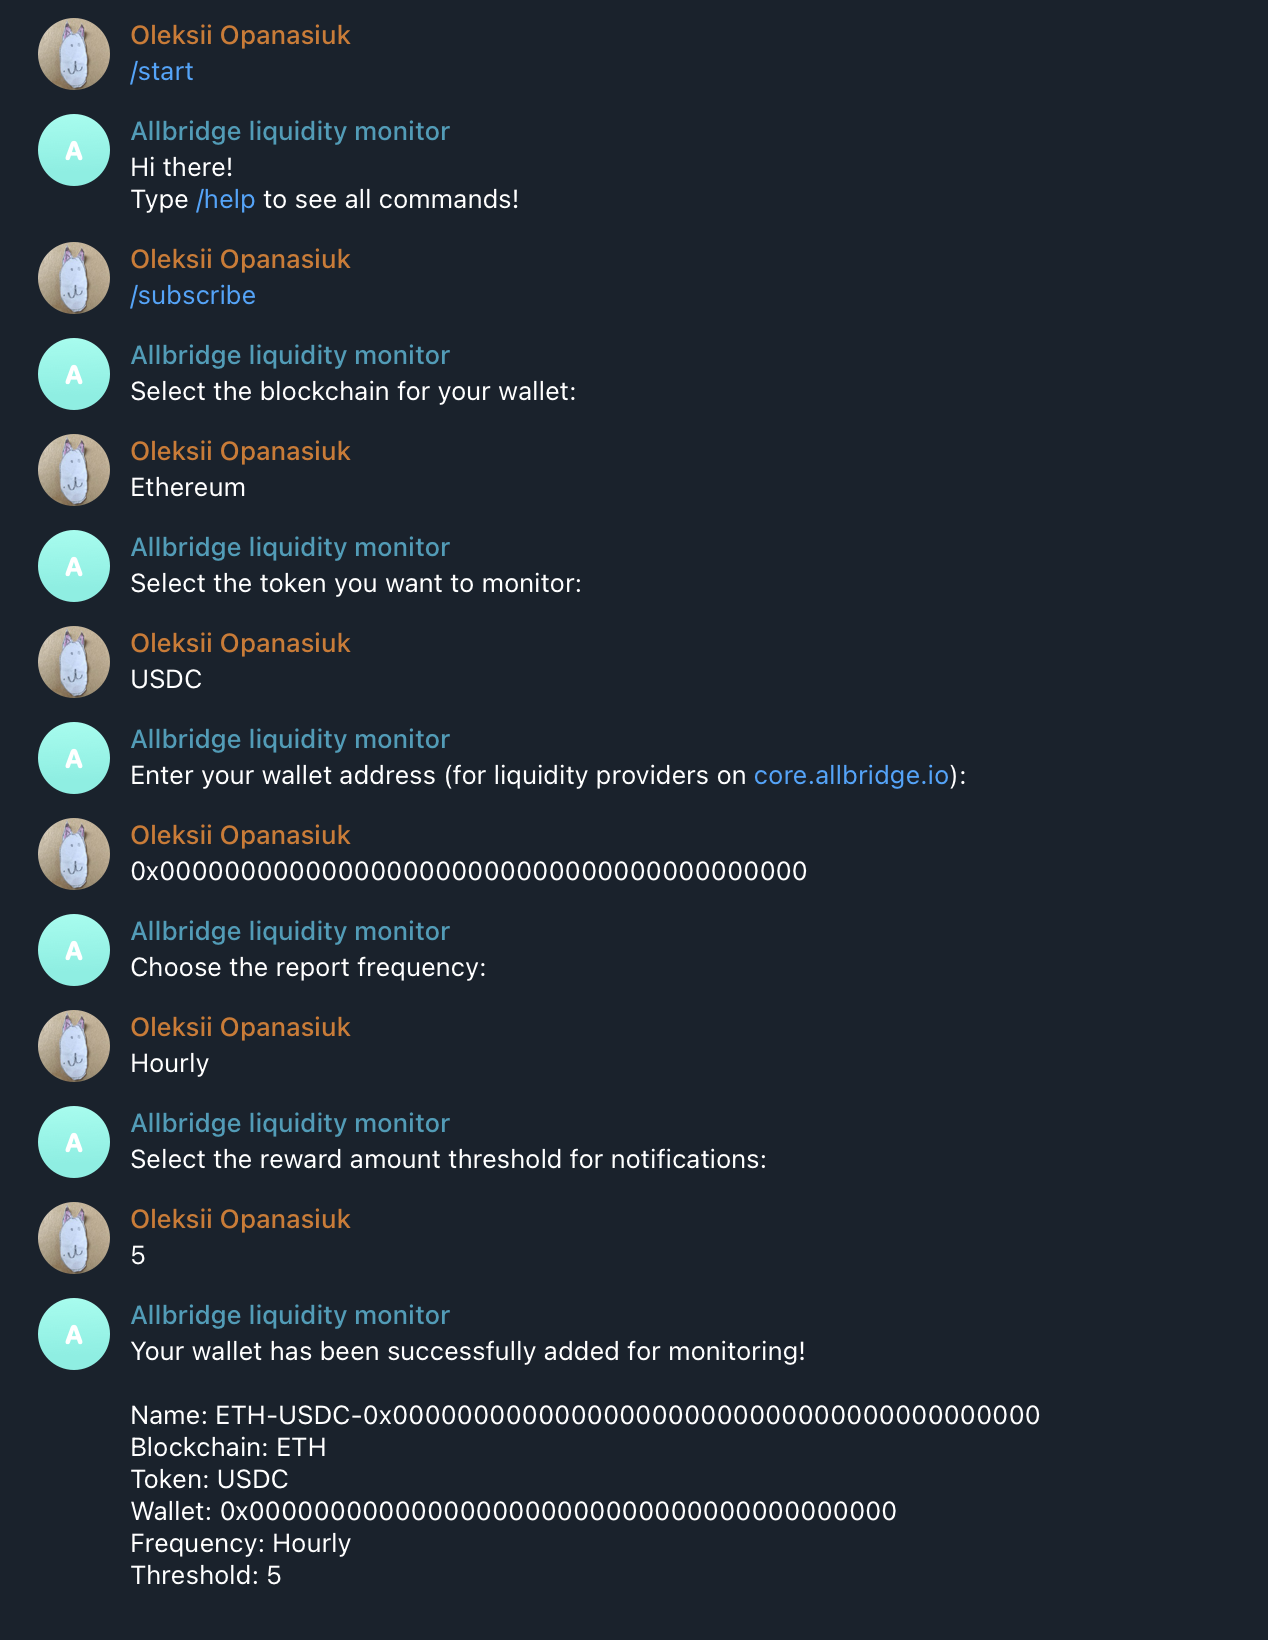
- Type the command: /start -> You should get a welcome message. That means your webhook is working, and the bot can talk to Telegram’s servers.
- Then type: /subscribe -> The bot will start guiding you through a short conversation
- Select the blockchain (Ethereum)
- Choose a token (for example, USDC)
- Enter your wallet address (starting with 0x...)
- Pick how often to get reports (Hourly, Daily, Weekly)
- Set your reward threshold (e.g. 5 USDC)
If everything went smoothly, the bot will confirm:
"Your wallet has been successfully added for monitoring!"

Now open your MySQL database, and you’ll see your wallet saved in the wallets table — just like that, through Telegram.
That’s your proof that the bot, database, and blockchain API are all talking to each other in real time
You did it 🎉
You now have a fully working Telegram bot that talks directly to the blockchain using Allbridge Core Rest API, your own small piece of Web3 automation.
Let’s recap what you’ve built today:
- You ran the Allbridge Core REST API locally with Docker
- You created a Telegram bot and connected it through PHP
- You launched a MySQL database inside Docker and linked it to your bot
- You added your first interactive command - /subscribe - that talks to a real blockchain API and stores data
What will we cover in next part:
- Add /
subscriptionsto show all subscriptions - Build a scheduled check (using cron) to send automatic reward updates
- Connect more chains - Polygon, BNB - just by expanding your .env and chainsMap
Think about it - in under an hour, you’ve connected Telegram, PHP, Docker, and a live blockchain.
You didn’t just follow a tutorial - you built a small automation tool that talks to the Ethereum network in real time.
If that feels like magic, it kind of is.
Share your build, your ideas, or your next feature - maybe a /subscriptions command, maybe reward tracking.
Either way, your first blockchain-integrated bot is alive. 🧠⚡


-0a4714b2-c0f8-4c92-a0ea-e47c5d800587.png)